
一、解释
1、rowSpan
1)、行合并
2)、当为0时:去掉边框
3)、当为1时:不合并
4)、大于1的x时:包含当前单元格行合并x个单元格
2、colSpan
1)、列合并
2)、当为0时:去掉边框
3)、当为1时:不合并
4)、大于1的x时:包含当前单元格列合并x个单元格
二、代码实现核心代码位置
在table对应的列的 customCell 返回对应需要合并的参数
const state = reactive({ columns: [ { title: 'VLAN值', dataIndex: 'value', key: 'value', align: 'center', colSpan: 2, // 表头合并 width: '120px', // 合并单元格配置 customCell: (_, index) => { // _:当前行的数据, index:当前行的索引 return { rowSpan:x, colSpan:y }; } }, { title: 'VLAN平面', dataIndex: 'type', key: 'type', align: 'center', colSpan: 0, // 前面一个字段合并2个, 因此紧接着的这个字段这里需要设置成0 width: '120px', // 合并单元格配置 customCell: (_, index) => { // _:当前行的数据, index:当前行的索引 return { rowSpan:x, colSpan:y }; } }, ... ] })
三、表格合并举例说明
1、初始效果

2、代码
1)、完整代码里包行自定义表头的方法
<template> <div class="container-warp"> <div class="content"> <a-table class="ant-table-striped" bordered :dataSource="state.tableSource" :columns="state.columns" :pagination="pagination" :scroll="{ x: state.tableWidth }" :row-class-name="(_record, index) => (index % 2 === 1 ? 'table-striped' : null)"> <!-- 表头自定义 --> <template #headerCell="{ column }"> <template v-if="column.dataIndex === 'deviceAttr1'"> <div class="result-warp"> <span>配置结果</span> <a-button :loading="state.resultLoading" type="link"> <template #icon> <SearchOutlined /> </template> </a-button> </div> </template> </template> <!-- 表格标题自定义 --> <template #title="{ column }"> <div style="text-align: center">!红色背景代表配置校验未通过,黄色背景代表配置校验需要二次确认</div> </template> <!-- 表格单元格自定义 --> <template #bodyCell="{ column, text, record, index }"> <template v-if="column.dataIndex == 'status'">{{ statusEnum[text] }}</template> <template v-if="column.dataIndex == 'deviceAttr1'"> <div style="padding: 5px 10px" :class="text == '未配置' ? 'result-un-config' : 'result-config'" :style="{ backgroundColor: text == '未配置' ? '#f00' : '#ff0', color: text == '未配置' ? '#fff' : '#000' }"> {{ text }} </div> </template> </template> </a-table> </div> </div> </template> <script setup> import { getTableWidth } from '@/utils/index.utils.js'; import { reactive } from 'vue'; const state = reactive({ columns: [ { title: 'VLAN值', dataIndex: 'value', key: 'value', align: 'center', width: '120px', customCell: (_, index) => { return {}; } }, { title: 'VLAN平面', dataIndex: 'type', key: 'type', align: 'center', width: '120px', customCell: (_, index) => { return {}; } }, { title: '设备名称', dataIndex: 'deviceName', key: 'deviceName', align: 'center', width: '200px' }, { title: '设备属性1', dataIndex: 'deviceAttr1', key: 'deviceAttr1', align: 'center', width: '200px' }, { title: '设备属性2', dataIndex: 'deviceAttr2', key: 'deviceAttr2', align: 'center', width: '200px' }, { title: '设备属性3', dataIndex: 'deviceAttr3', key: 'deviceAttr3', align: 'center', width: '200px' }, { title: '设备属性4', dataIndex: 'deviceAttr4', key: 'deviceAttr4', align: 'center', width: '200px' }, { title: '设备属性5', dataIndex: 'deviceAttr5', key: 'deviceAttr5', align: 'center', width: '200px' }, { title: '设备属性6', dataIndex: 'deviceAttr6', key: 'deviceAttr6', align: 'center', width: '200px' }, { title: '确认状态', dataIndex: 'confirm', key: 'confirm', align: 'center', width: '120px', customCell: (_, index) => { return {}; } } ], tableSource: [ { value: '100', type: 'vlan', deviceName: '设备100-1', deviceAttr1: '已配置', deviceAttr2: '是', deviceAttr3: '是', deviceAttr4: '是', deviceAttr5: '是', deviceAttr6: '是', confirm: '已确认' }, { value: '100', type: 'vlan', deviceName: '设备100-2', deviceAttr1: '未配置', deviceAttr2: '否', deviceAttr3: '否', deviceAttr4: '否', deviceAttr5: '否', deviceAttr6: '否', confirm: '已确认' }, { value: '101', type: 'vlan', deviceName: '设备101', deviceAttr1: '未配置', deviceAttr2: '否', deviceAttr3: '否', deviceAttr4: '否', deviceAttr5: '否', deviceAttr6: '否', confirm: '待确认' }, { value: '102', type: 'vlan', deviceName: '设备102-1', deviceAttr1: '未配置', deviceAttr2: '否', deviceAttr3: '否', deviceAttr4: '否', deviceAttr5: '否', deviceAttr6: '否', confirm: '待确认' }, { value: '102', type: 'vlan', deviceName: '设备102-2', deviceAttr1: '未配置', deviceAttr2: '否', deviceAttr3: '否', deviceAttr4: '否', deviceAttr5: '否', deviceAttr6: '否', confirm: '待确认' }, { value: '102', type: 'vlan', deviceName: '设备102-3', deviceAttr1: '未配置', deviceAttr2: '否', deviceAttr3: '否', deviceAttr4: '否', deviceAttr5: '否', deviceAttr6: '否', confirm: '待确认' } ], tableWidth: 1200 }); state.tableWidth = getTableWidth(state.columns); </script> <style lang="less" scoped> .container-warp { width: 100%; height: 100%; background-color: #f5f5f5; padding: 20px; .content { padding: 20px; background-color: #fff; } } </style>
2、eg1:
如图, 假如需要合并 框出的两个单元格(列合并)
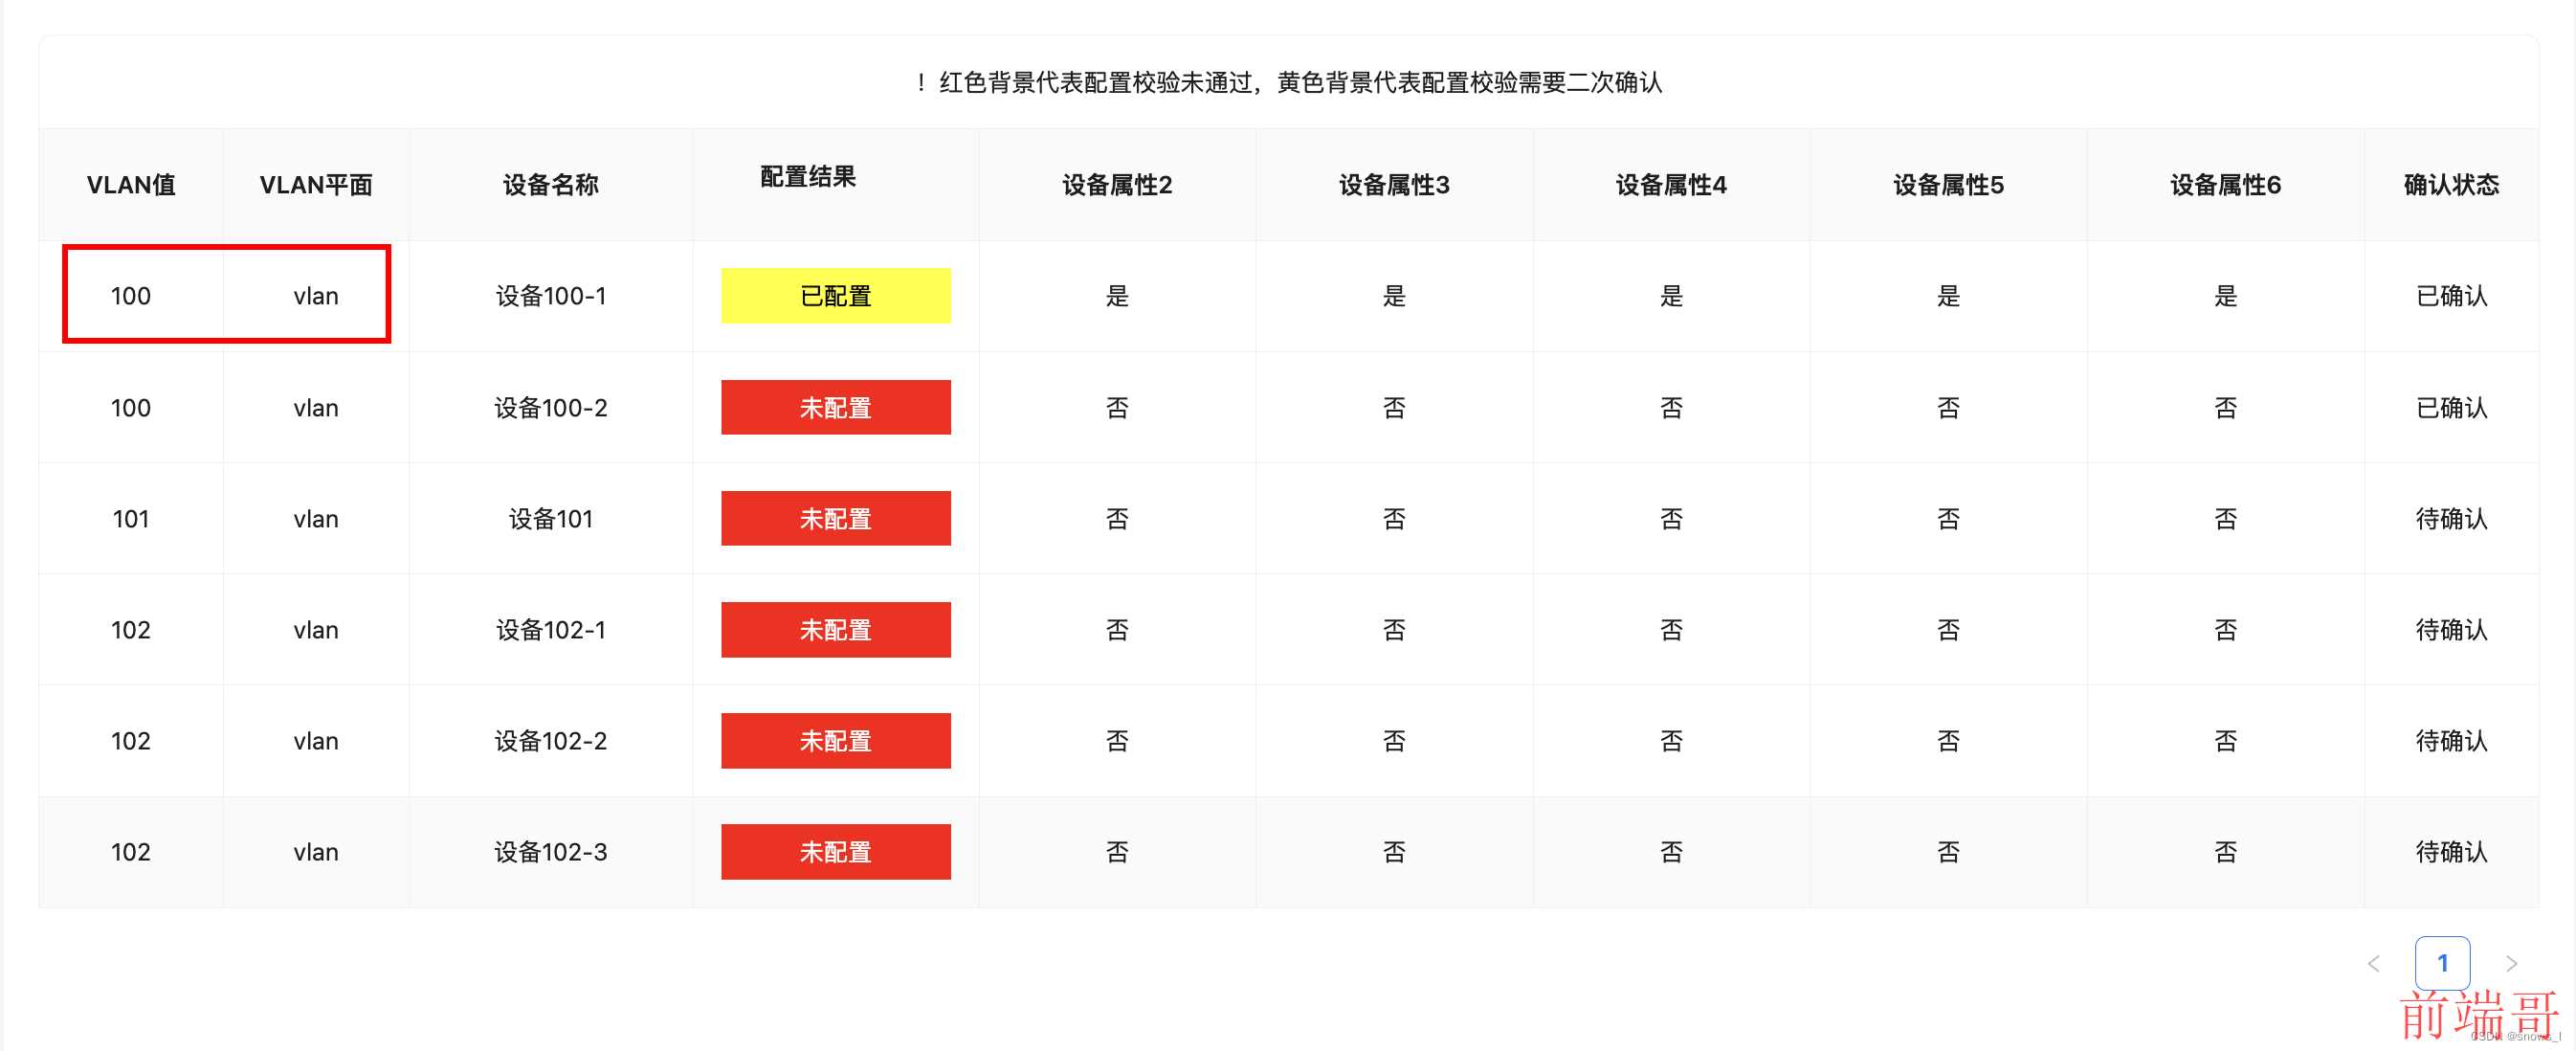
这个时候就需要使用列合并colSpan,将第1行的第一个字段与第2个字段就行,代码如下
columns: [ { title: 'VLAN值', dataIndex: 'value', key: 'value', align: 'center', width: '120px', customCell: (_, index) => { return { colSpan: index === 0 ? 2 : 1 // 第一个字段的第一行列合并 2 }; } }, { title: 'VLAN平面', dataIndex: 'type', key: 'type', align: 'center', width: '120px', customCell: (_, index) => { return { colSpan: index === 0 ? 0 : 1 // 第一个字段的第一行列合并 0, 去掉原有单元个 }; } }, ... ]

特别注意:
如果合并2个, 第一个设置colSpan:2, 第一个后面紧接着的 1 个字段必须设置colSpan:0, 行合并也同理
如果合并5个, 第一个设置colSpan:5, 第一个后面紧接着的 4 个字段必须设置colSpan:0, 行合并也同理
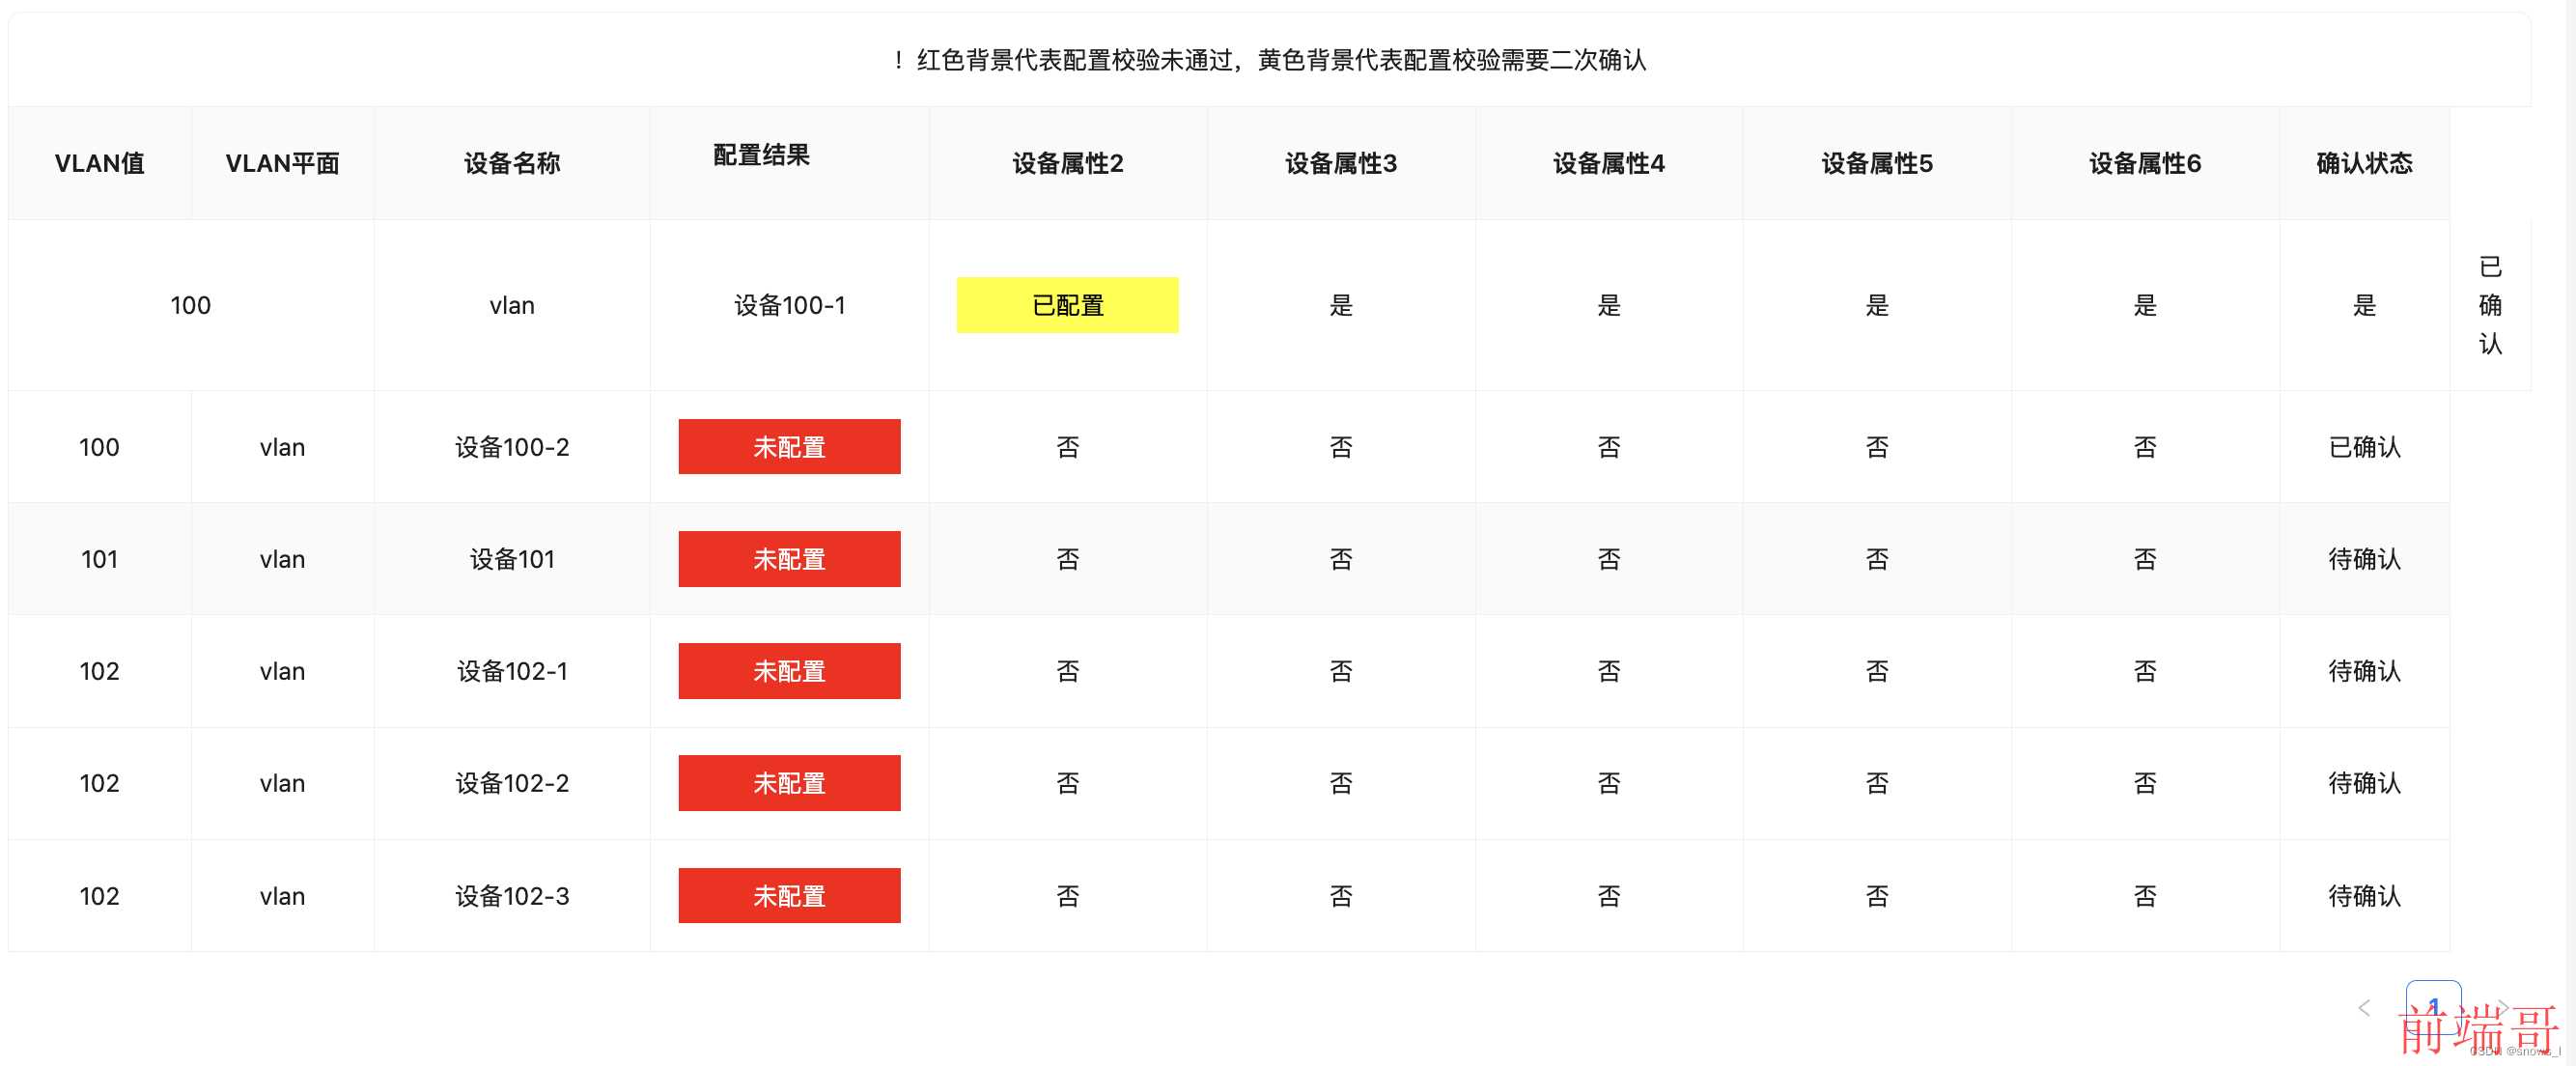
如果后面的不设置span:0就会出现一下结果:单元个往后推移了一个
3、eg2:
如图, 假如需要合并 框出的三个单元格(行合并)
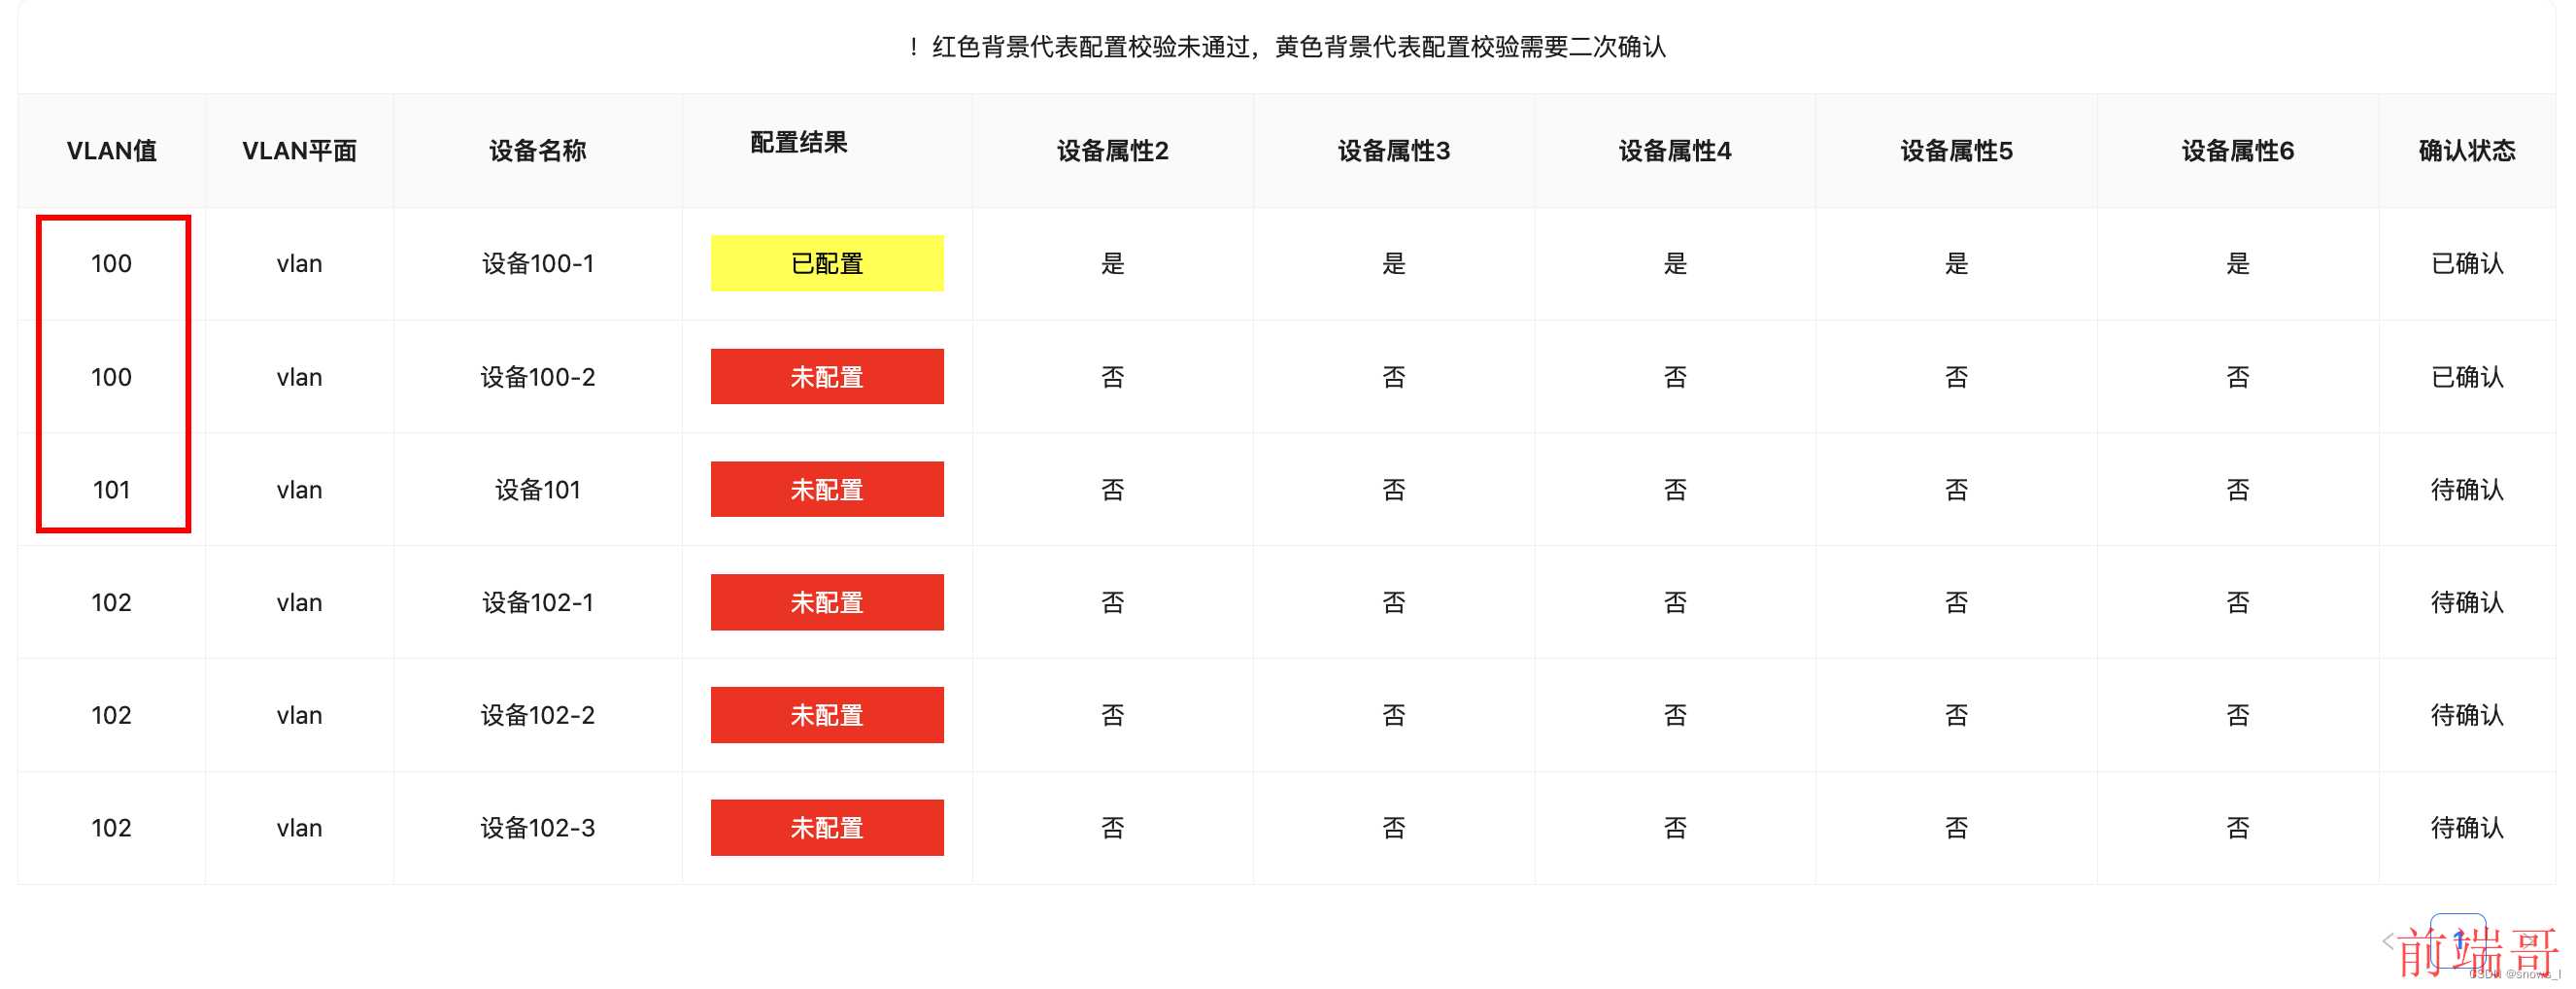
这个时候就需要使用列合并rowSpan,将第1个字段的第一行到第3行合并,代码如下
const state = reactive({ columns: [ { title: 'VLAN值', dataIndex: 'value', key: 'value', align: 'center', width: '120px', customCell: (_, index) => { return { rowSpan: index === 0 ? 3 : 1 }; } }, { title: 'VLAN平面', dataIndex: 'type', key: 'type', align: 'center', width: '120px', customCell: (_, index) => { return { rowSpan: index === 1 || index === 2 ? 0 : 1 }; } }, ... ] })
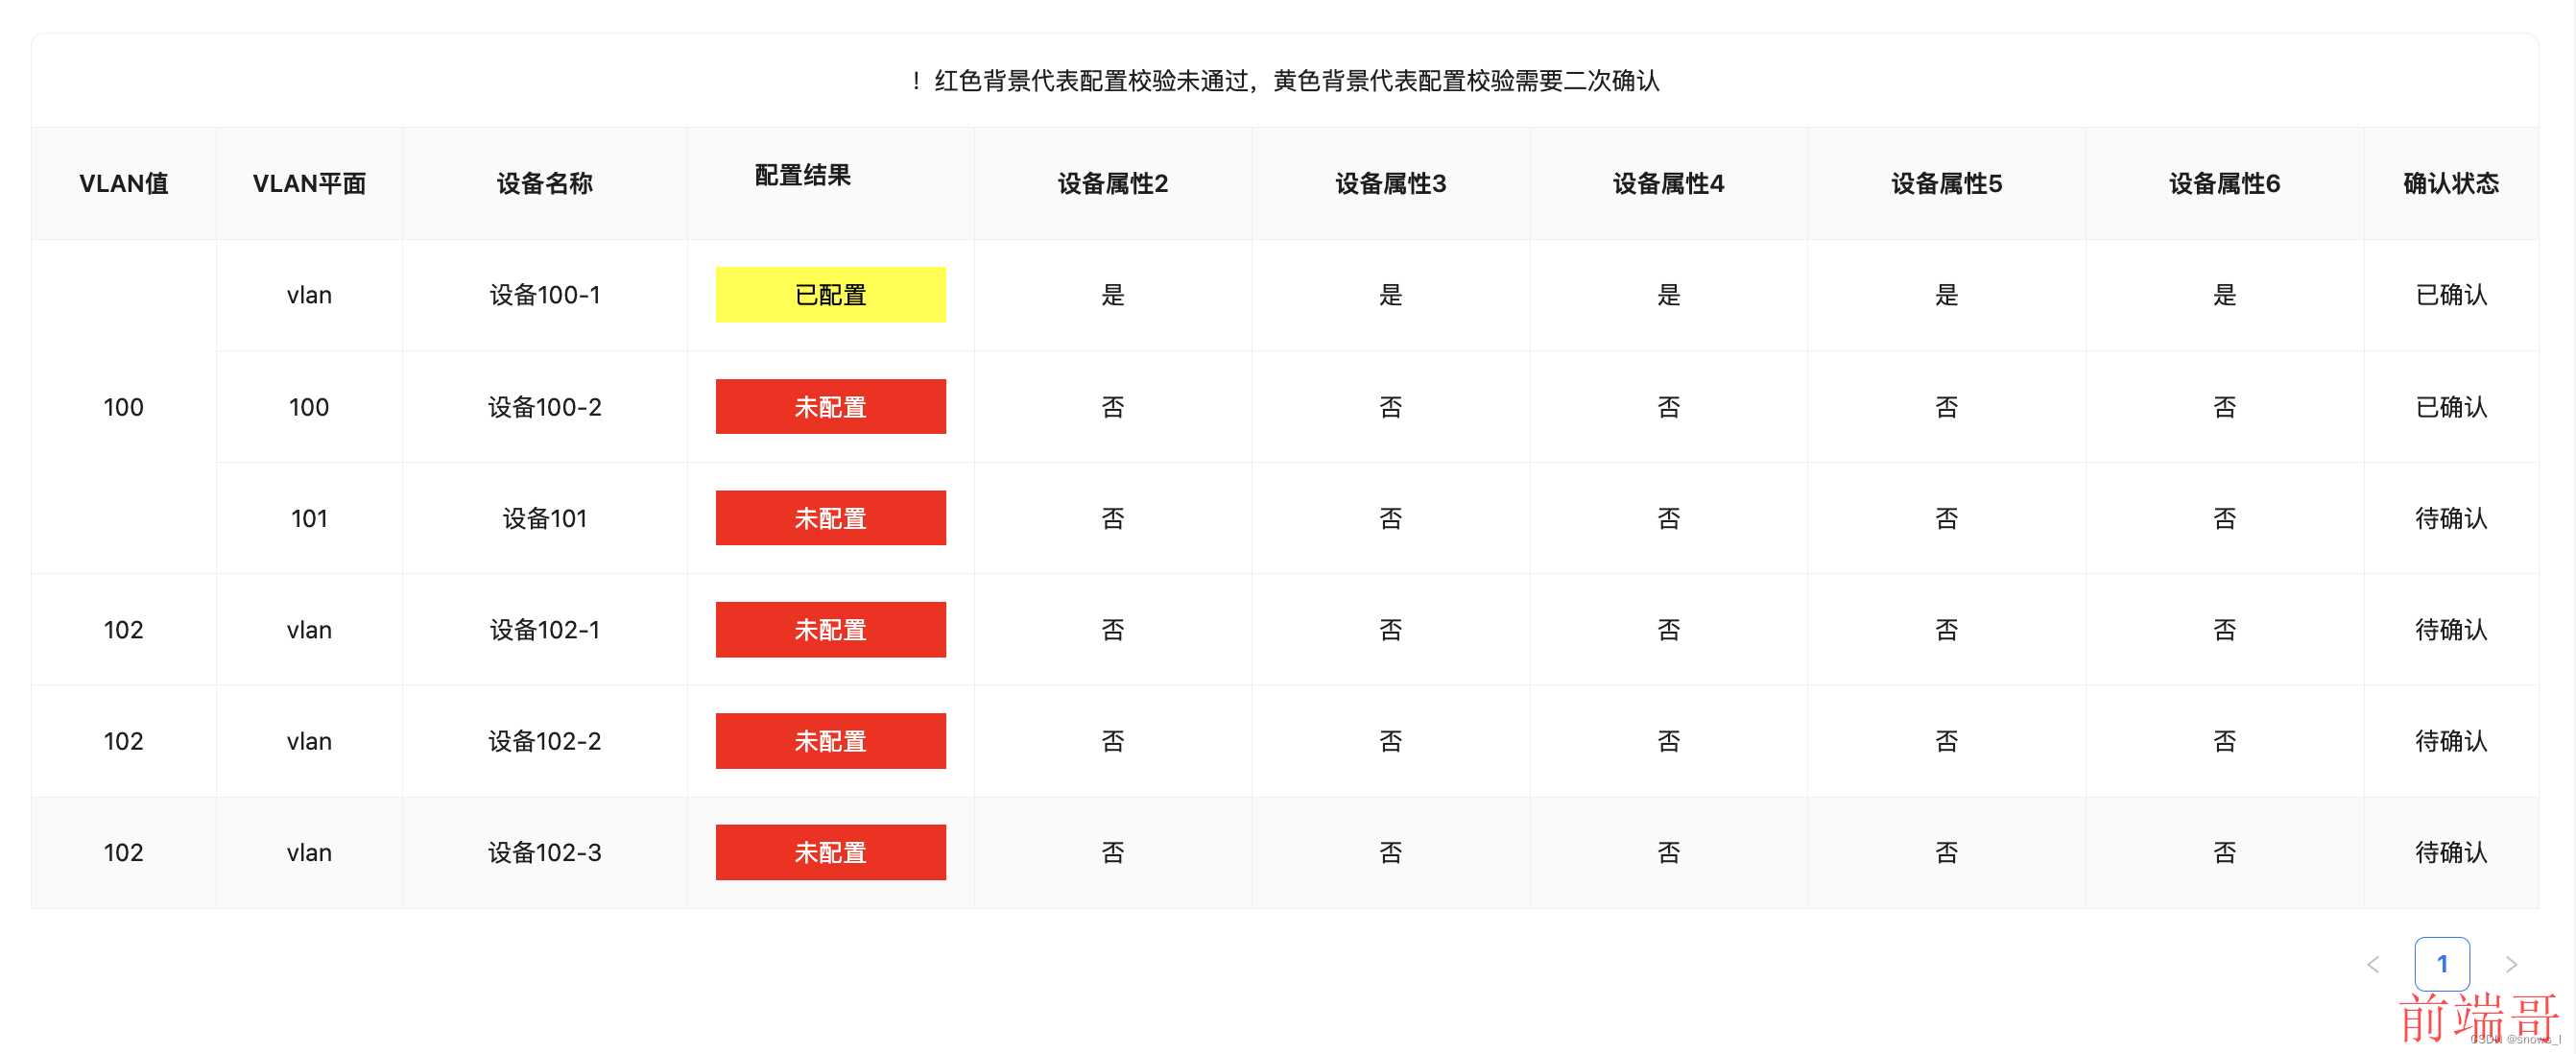
效果如下
特别注意:
如果合并3行, 第一个设置rowSpan:2, 第一个后面紧接着的 2 行必须设置colSpan:0, 行合并也同理
如果合并5个, 第一个设置rowSpan:5, 第一个后面紧接着的 4 行必须设置colSpan:0, 行合并也同理
4、eg3:
如图, 以valn值 为基础,由于vlan值重复, 需要合并如下图框处的单元格 (中间部分为设备信息, 一个vlan里出现了多台设备的情况)
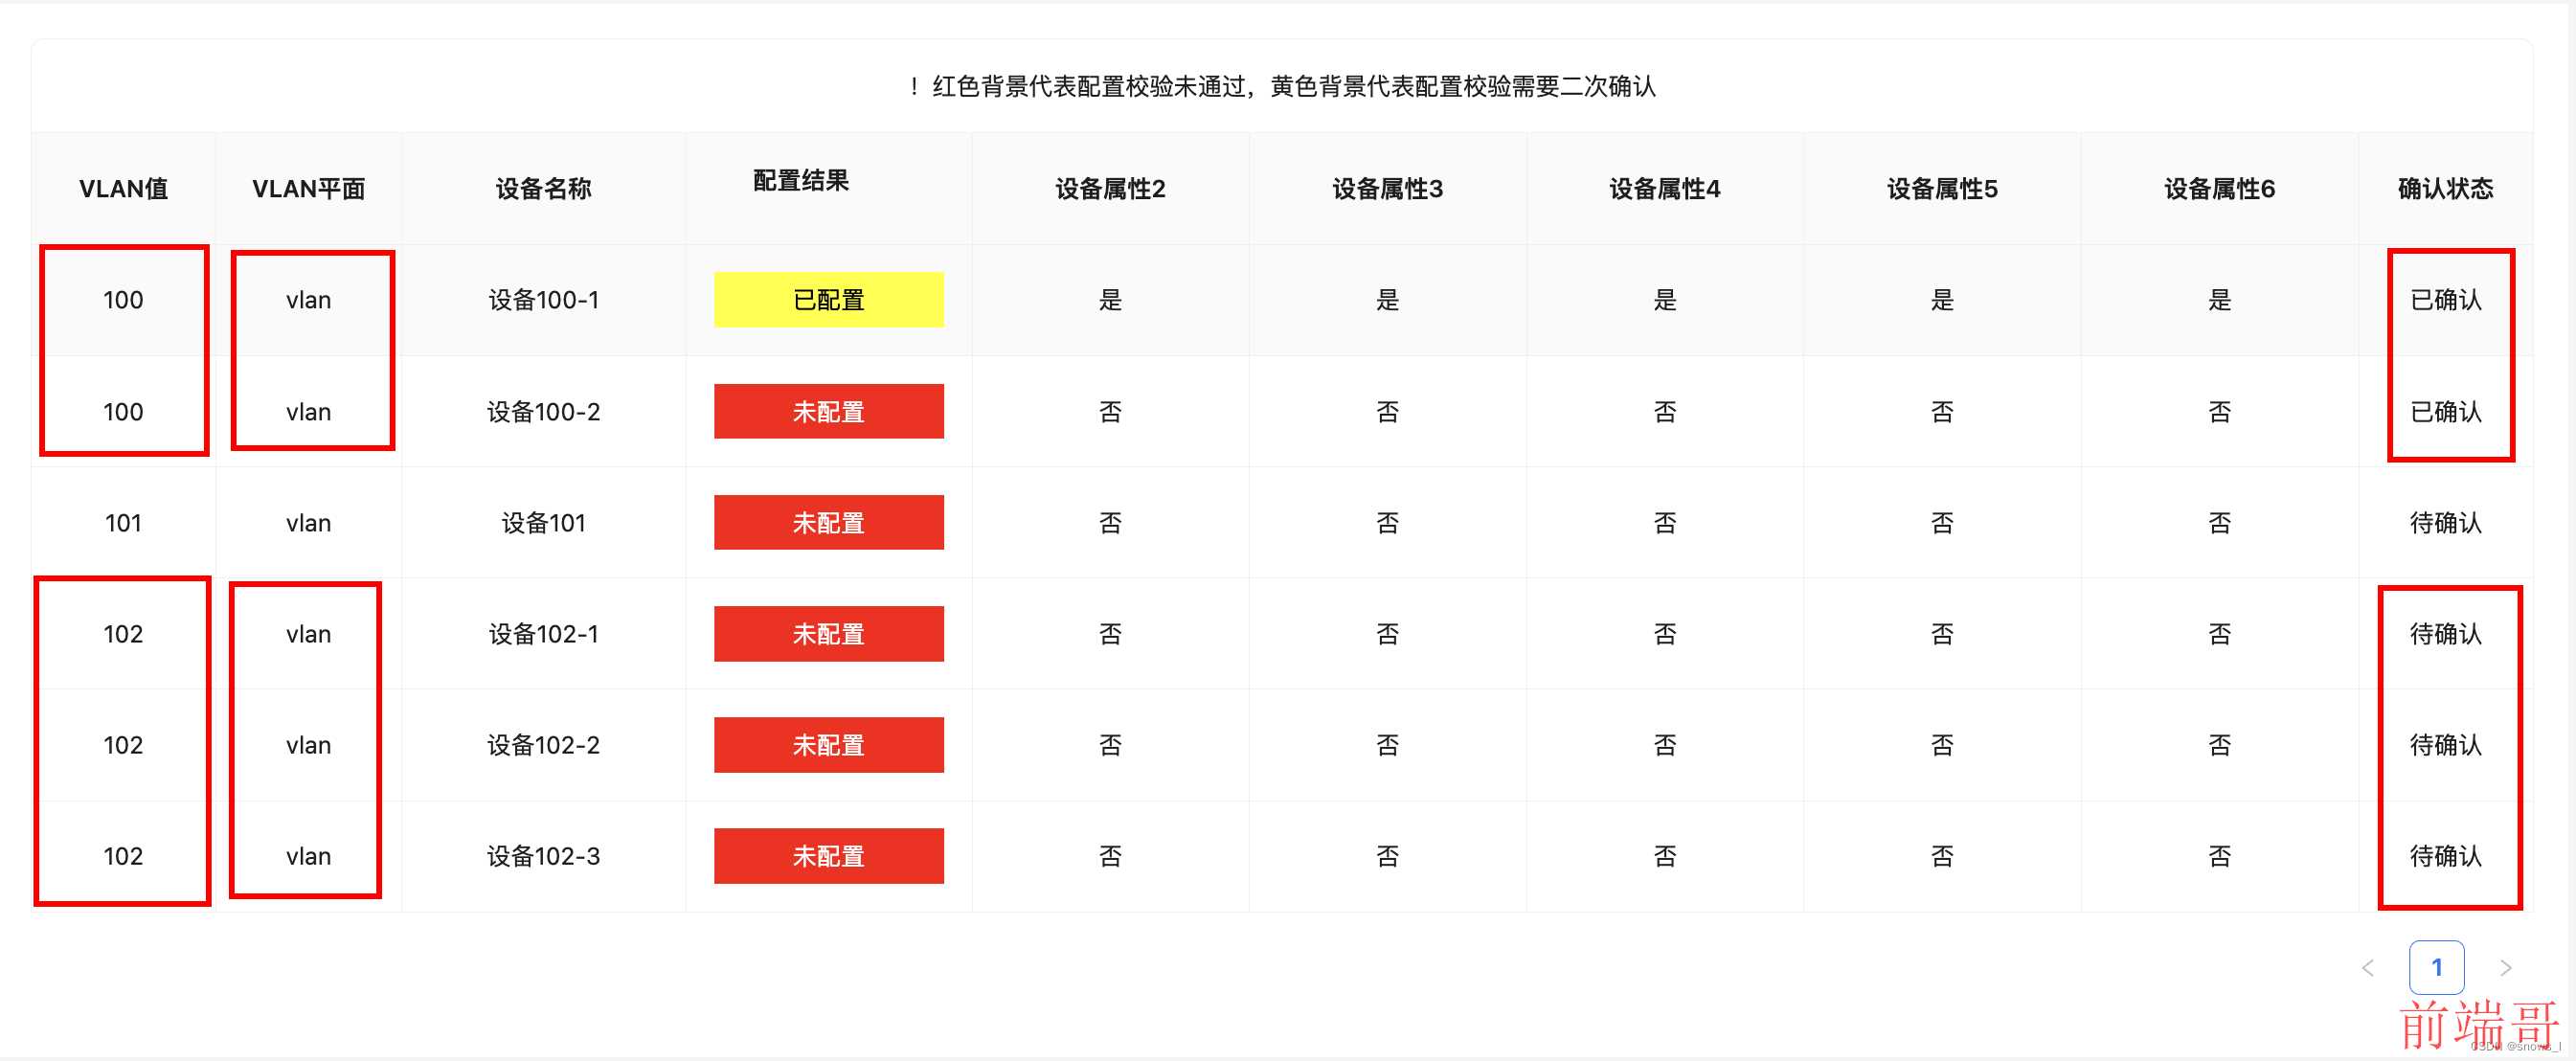
根据需求, 就应该需要就可以得到,字段 vlan值、vlan平面、确认状态三个字段(三列)的第1行第2行需要合并在一起, 第4行-第6行需要合并,(所以就需要从这三个字段的 customCell 入手) 实现代码如下,(因为只是行合并就只需要操作rowSpan即可)
const state = reactive({ columns: [ { title: 'VLAN值', dataIndex: 'value', key: 'value', align: 'center', width: '120px', customCell: (_, index) => { return { rowSpan: _.rowSpan }; } }, { title: 'VLAN平面', dataIndex: 'type', key: 'type', align: 'center', width: '120px', customCell: (_, index) => { return { rowSpan: _.rowSpan }; } }, ... { title: '确认状态', dataIndex: 'confirm', key: 'confirm', align: 'center', width: '120px', customCell: (_, index) => { return { rowSpan: _.rowSpan }; } } ], tableSource: [ { value: '100', type: 'vlan', deviceName: '设备100-1', deviceAttr1: '已配置', deviceAttr2: '是', deviceAttr3: '是', deviceAttr4: '是', deviceAttr5: '是', deviceAttr6: '是', confirm: '已确认', rowSpan: 2 // 第1行 行合并2个单元个 }, { value: '100', type: 'vlan', deviceName: '设备100-2', deviceAttr1: '未配置', deviceAttr2: '否', deviceAttr3: '否', deviceAttr4: '否', deviceAttr5: '否', deviceAttr6: '否', confirm: '已确认', rowSpan: 0 // 由于 第1行 行合并2个占用了此行,因此需要设置rowSpan: 0去掉此行 }, { // 第3行不合并不做处理 加上rowSpan:1也没有关系 value: '101', type: 'vlan', deviceName: '设备101', deviceAttr1: '未配置', deviceAttr2: '否', deviceAttr3: '否', deviceAttr4: '否', deviceAttr5: '否', deviceAttr6: '否', confirm: '待确认' }, { value: '102', type: 'vlan', deviceName: '设备102-1', deviceAttr1: '未配置', deviceAttr2: '否', deviceAttr3: '否', deviceAttr4: '否', deviceAttr5: '否', deviceAttr6: '否', confirm: '待确认', rowSpan: 3 // 第4行 行合并3个单元个, 因为行合并3后面的2行都要 rowSpan都要设置成0 }, { value: '102', type: 'vlan', deviceName: '设备102-2', deviceAttr1: '未配置', deviceAttr2: '否', deviceAttr3: '否', deviceAttr4: '否', deviceAttr5: '否', deviceAttr6: '否', confirm: '待确认', rowSpan: 0 // 由于 第4行 行合并2个占用了此行,因此需要设置rowSpan: 0去掉此行 }, { value: '102', type: 'vlan', deviceName: '设备102-3', deviceAttr1: '未配置', deviceAttr2: '否', deviceAttr3: '否', deviceAttr4: '否', deviceAttr5: '否', deviceAttr6: '否', confirm: '待确认', rowSpan: 0 // 由于 第4行 行合并2个占用了此行,因此需要设置rowSpan: 0去掉此行 } ], tableWidth: 1200 });
一下代码与上面代码等同
columns: [ { title: 'VLAN值', dataIndex: 'value', key: 'value', align: 'center', width: '120px', customCell: (_, index) => { let spanEmun = { 0: 2, 1: 0, 2: 1, 3: 3, 4: 0, 5: 0 }; return { rowSpan: spanEmun[index] }; } }, { title: 'VLAN平面', dataIndex: 'type', key: 'type', align: 'center', width: '120px', customCell: (_, index) => { let spanEmun = { 0: 2, 1: 0, 2: 1, 3: 3, 4: 0, 5: 0 }; return { rowSpan: spanEmun[index] }; } }, { title: '设备名称', dataIndex: 'deviceName', key: 'deviceName', align: 'center', width: '200px' }, { title: '设备属性1', dataIndex: 'deviceAttr1', key: 'deviceAttr1', align: 'center', width: '200px' }, { title: '设备属性2', dataIndex: 'deviceAttr2', key: 'deviceAttr2', align: 'center', width: '200px' }, { title: '设备属性3', dataIndex: 'deviceAttr3', key: 'deviceAttr3', align: 'center', width: '200px' }, { title: '设备属性4', dataIndex: 'deviceAttr4', key: 'deviceAttr4', align: 'center', width: '200px' }, { title: '设备属性5', dataIndex: 'deviceAttr5', key: 'deviceAttr5', align: 'center', width: '200px' }, { title: '设备属性6', dataIndex: 'deviceAttr6', key: 'deviceAttr6', align: 'center', width: '200px' }, { title: '确认状态', dataIndex: 'confirm', key: 'confirm', align: 'center', width: '120px', customCell: (_, index) => { let spanEmun = { 0: 2, 1: 0, 2: 1, 3: 3, 4: 0, 5: 0 }; return { rowSpan: spanEmun[index] }; } } ],
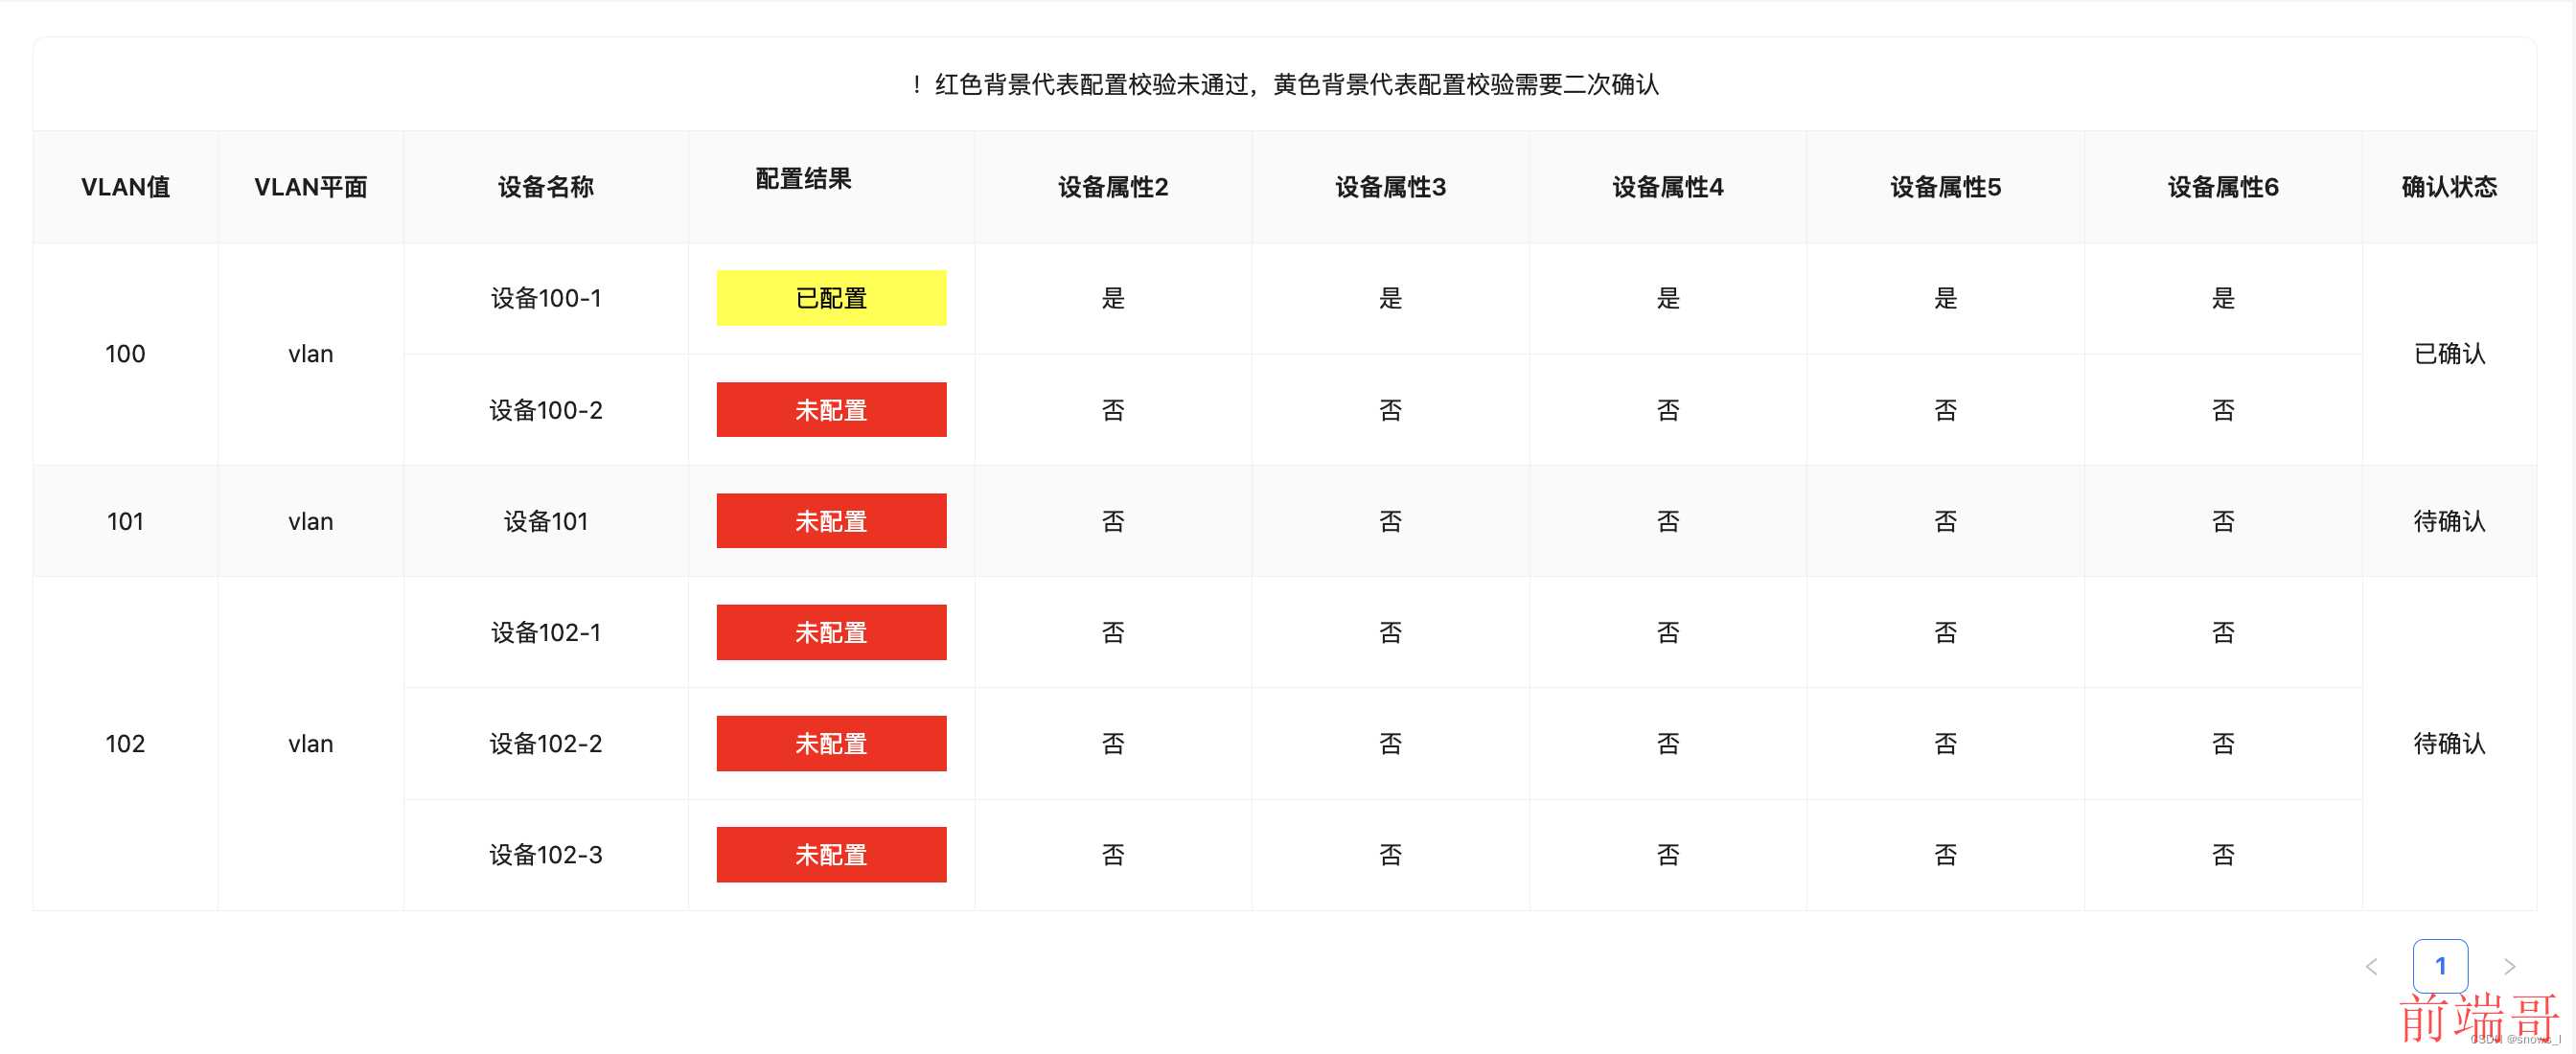
效果如下:
5、eg4:
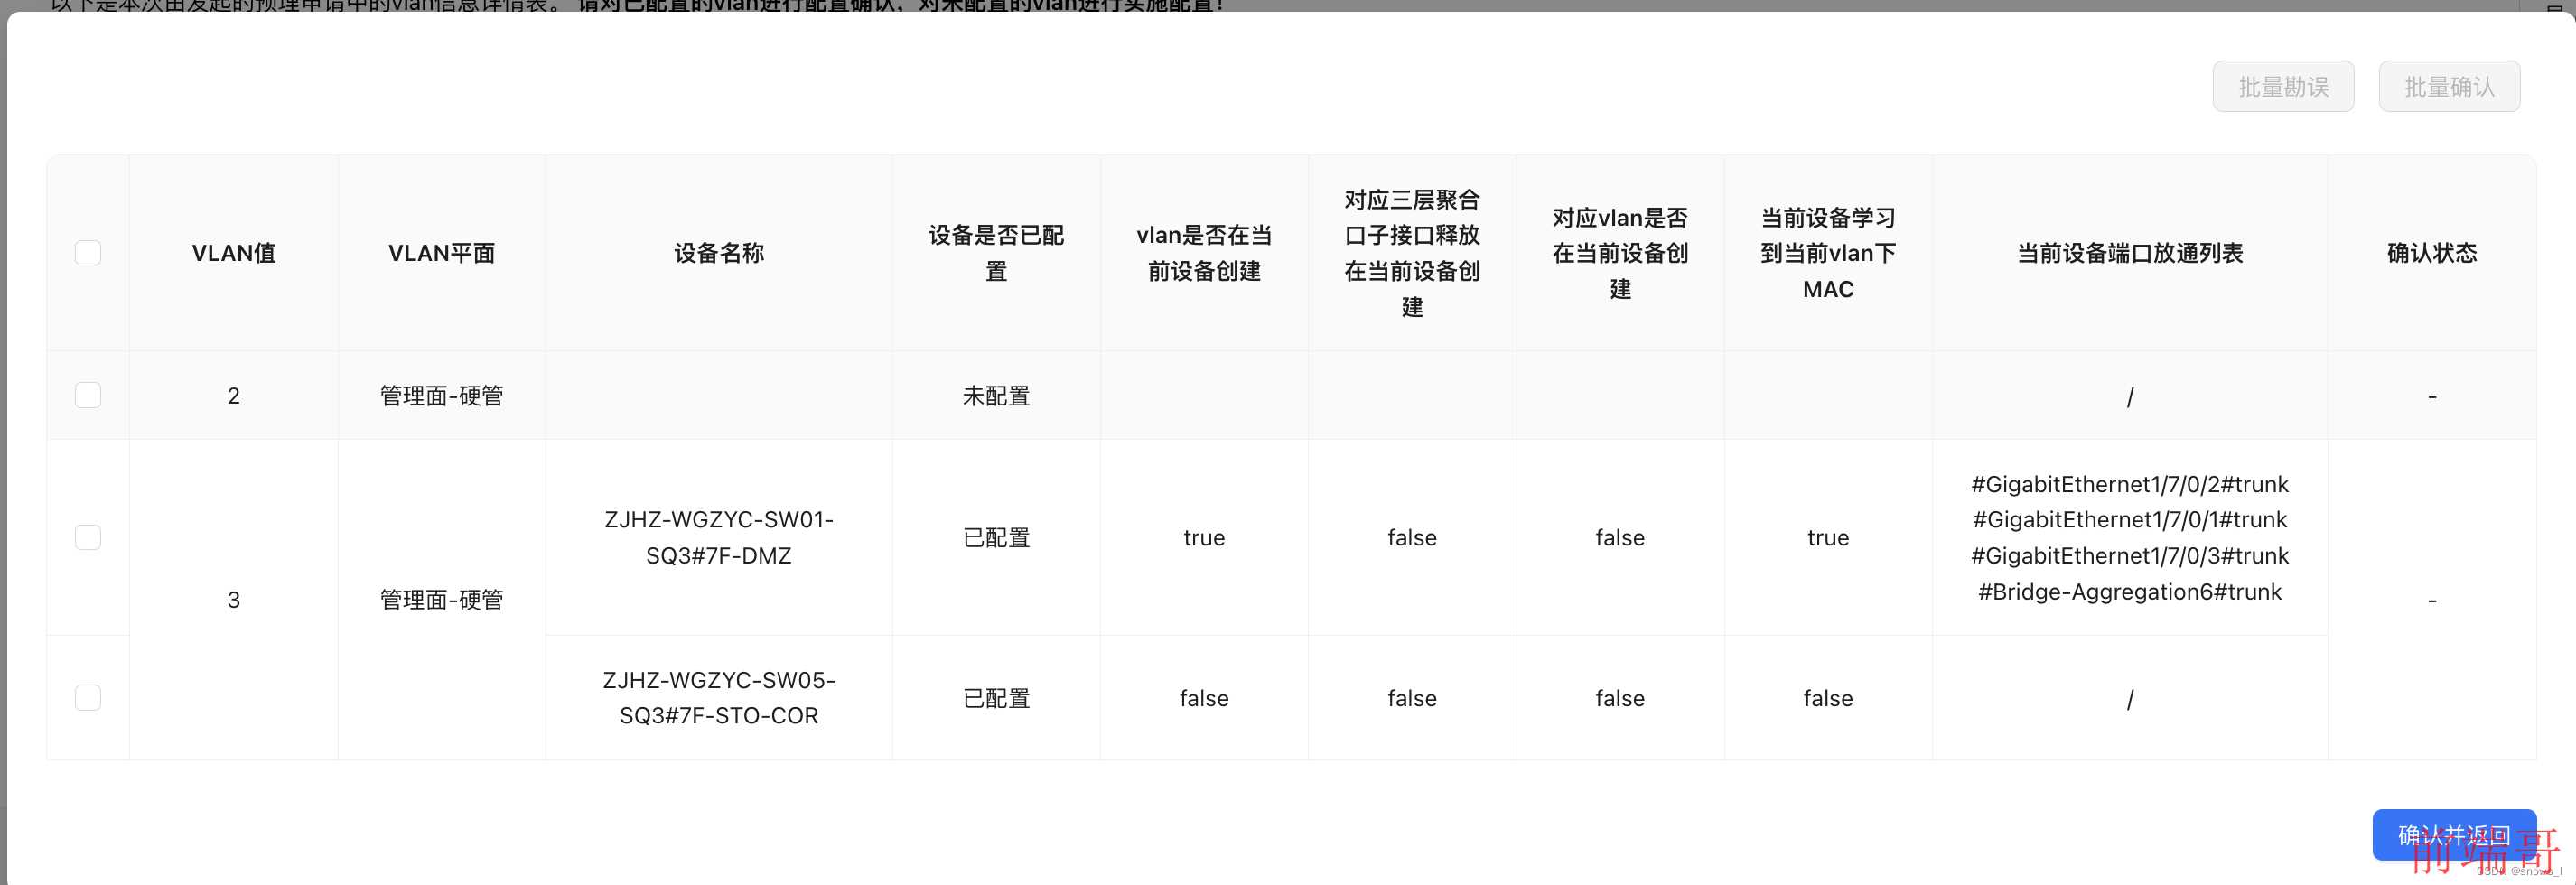
自己项目遇到的合并信息
解释一下, 其实后端给的数据时这样的, 两个vlan信息,每个vlan信息下面都有自己的设备列表, 因此需要我们自己把设备列表提出来,实现满足table的格式,
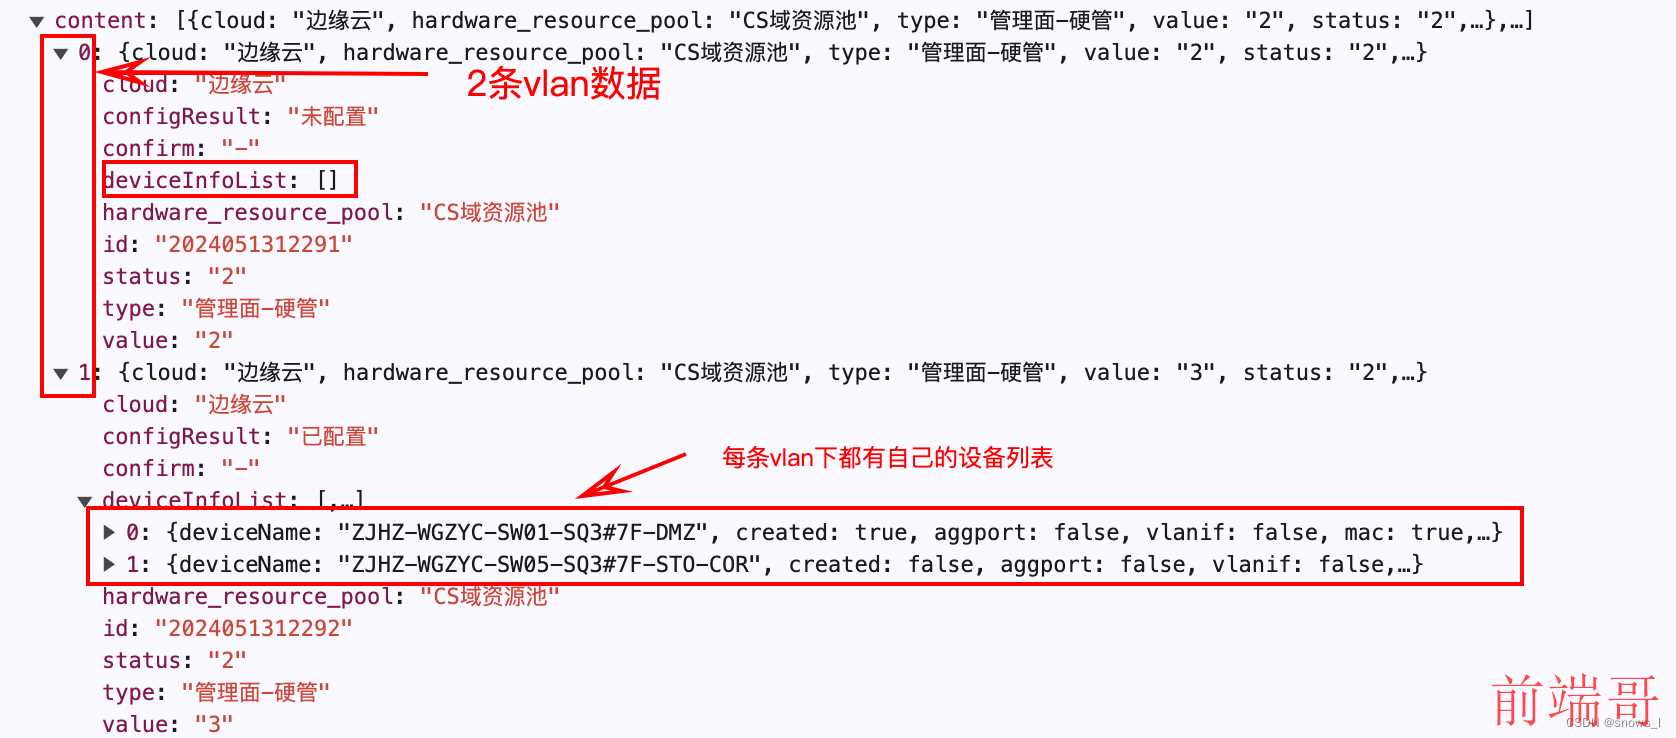
这个时候就需要处理数据
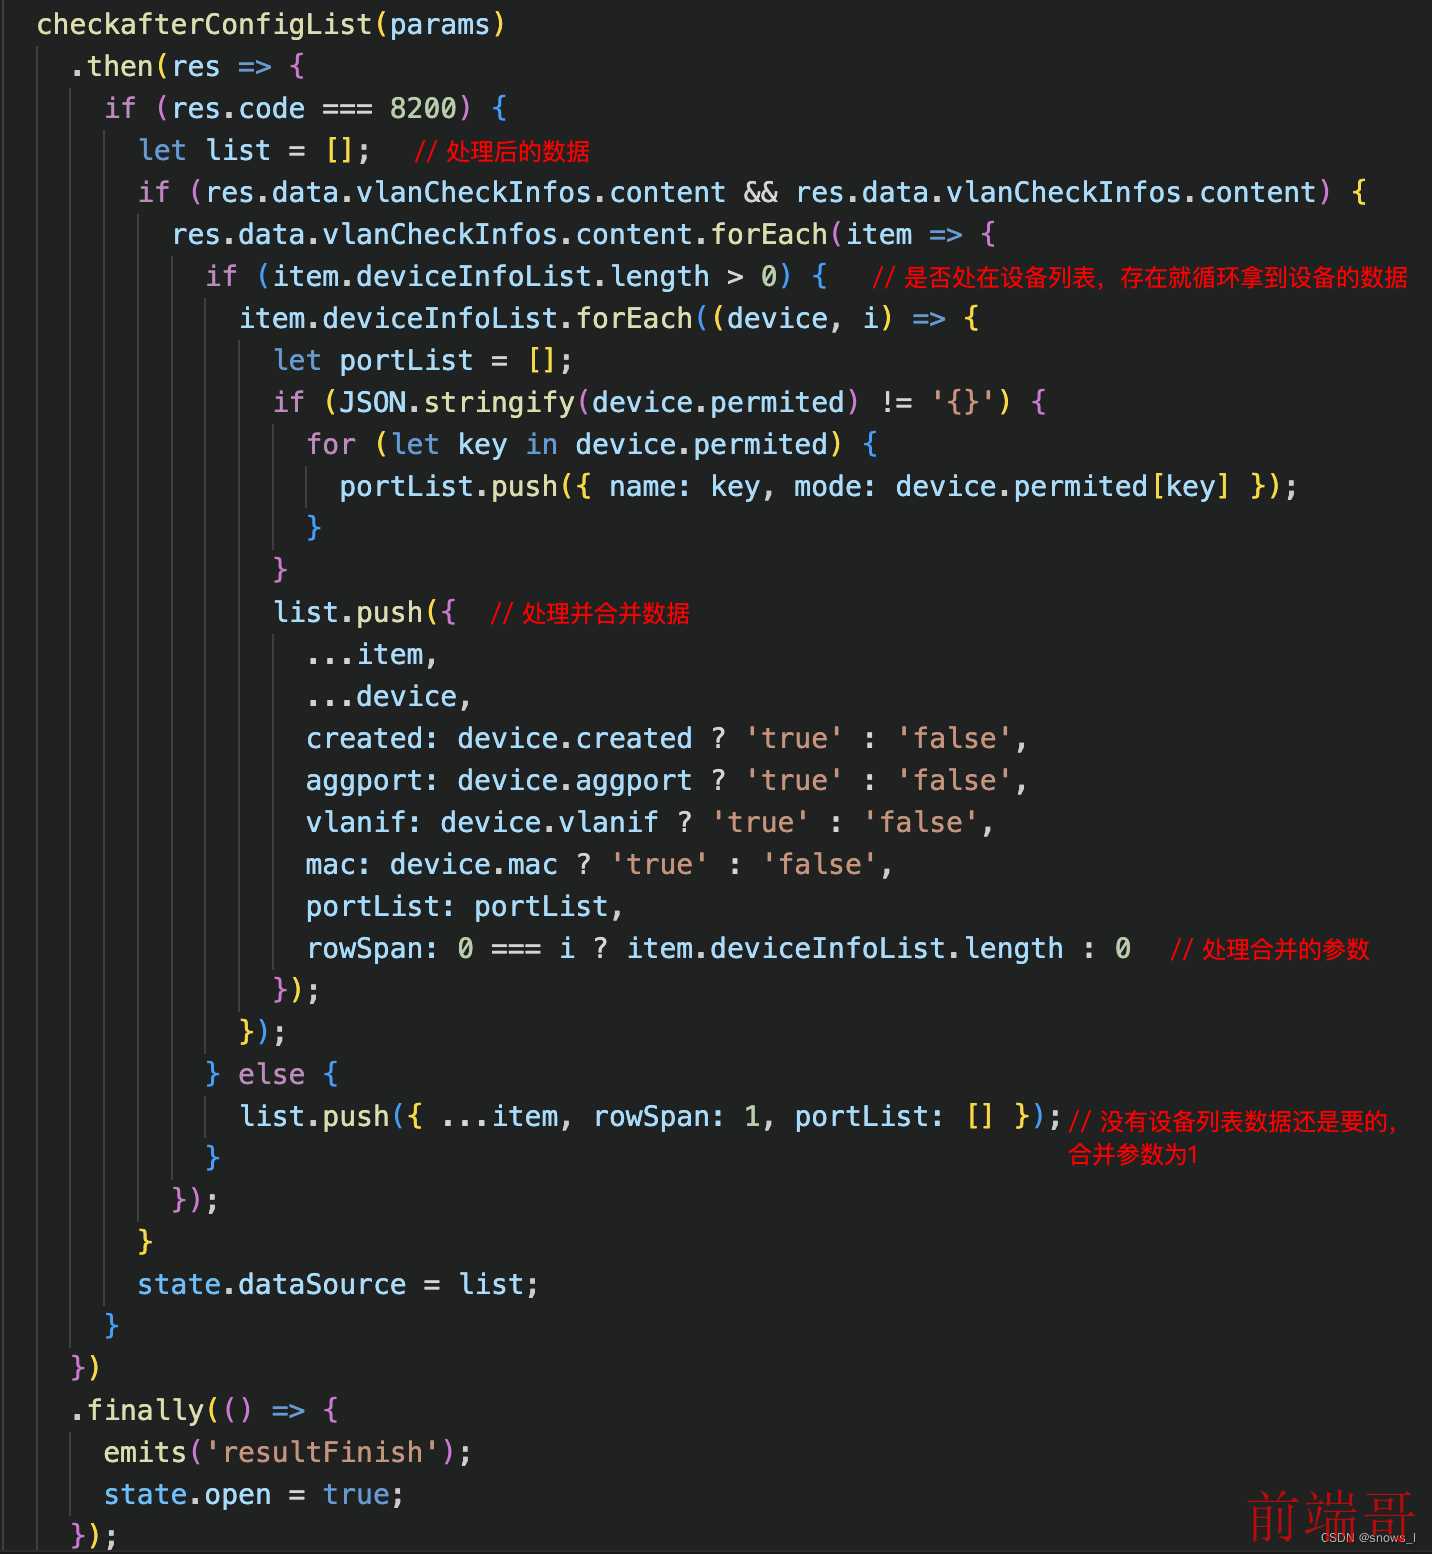
结果如下
四、表头合并
只需要在 columns 中设置 colSpan 即可, 跟表格原理一样
eg:
如图需要合并框出来的表头
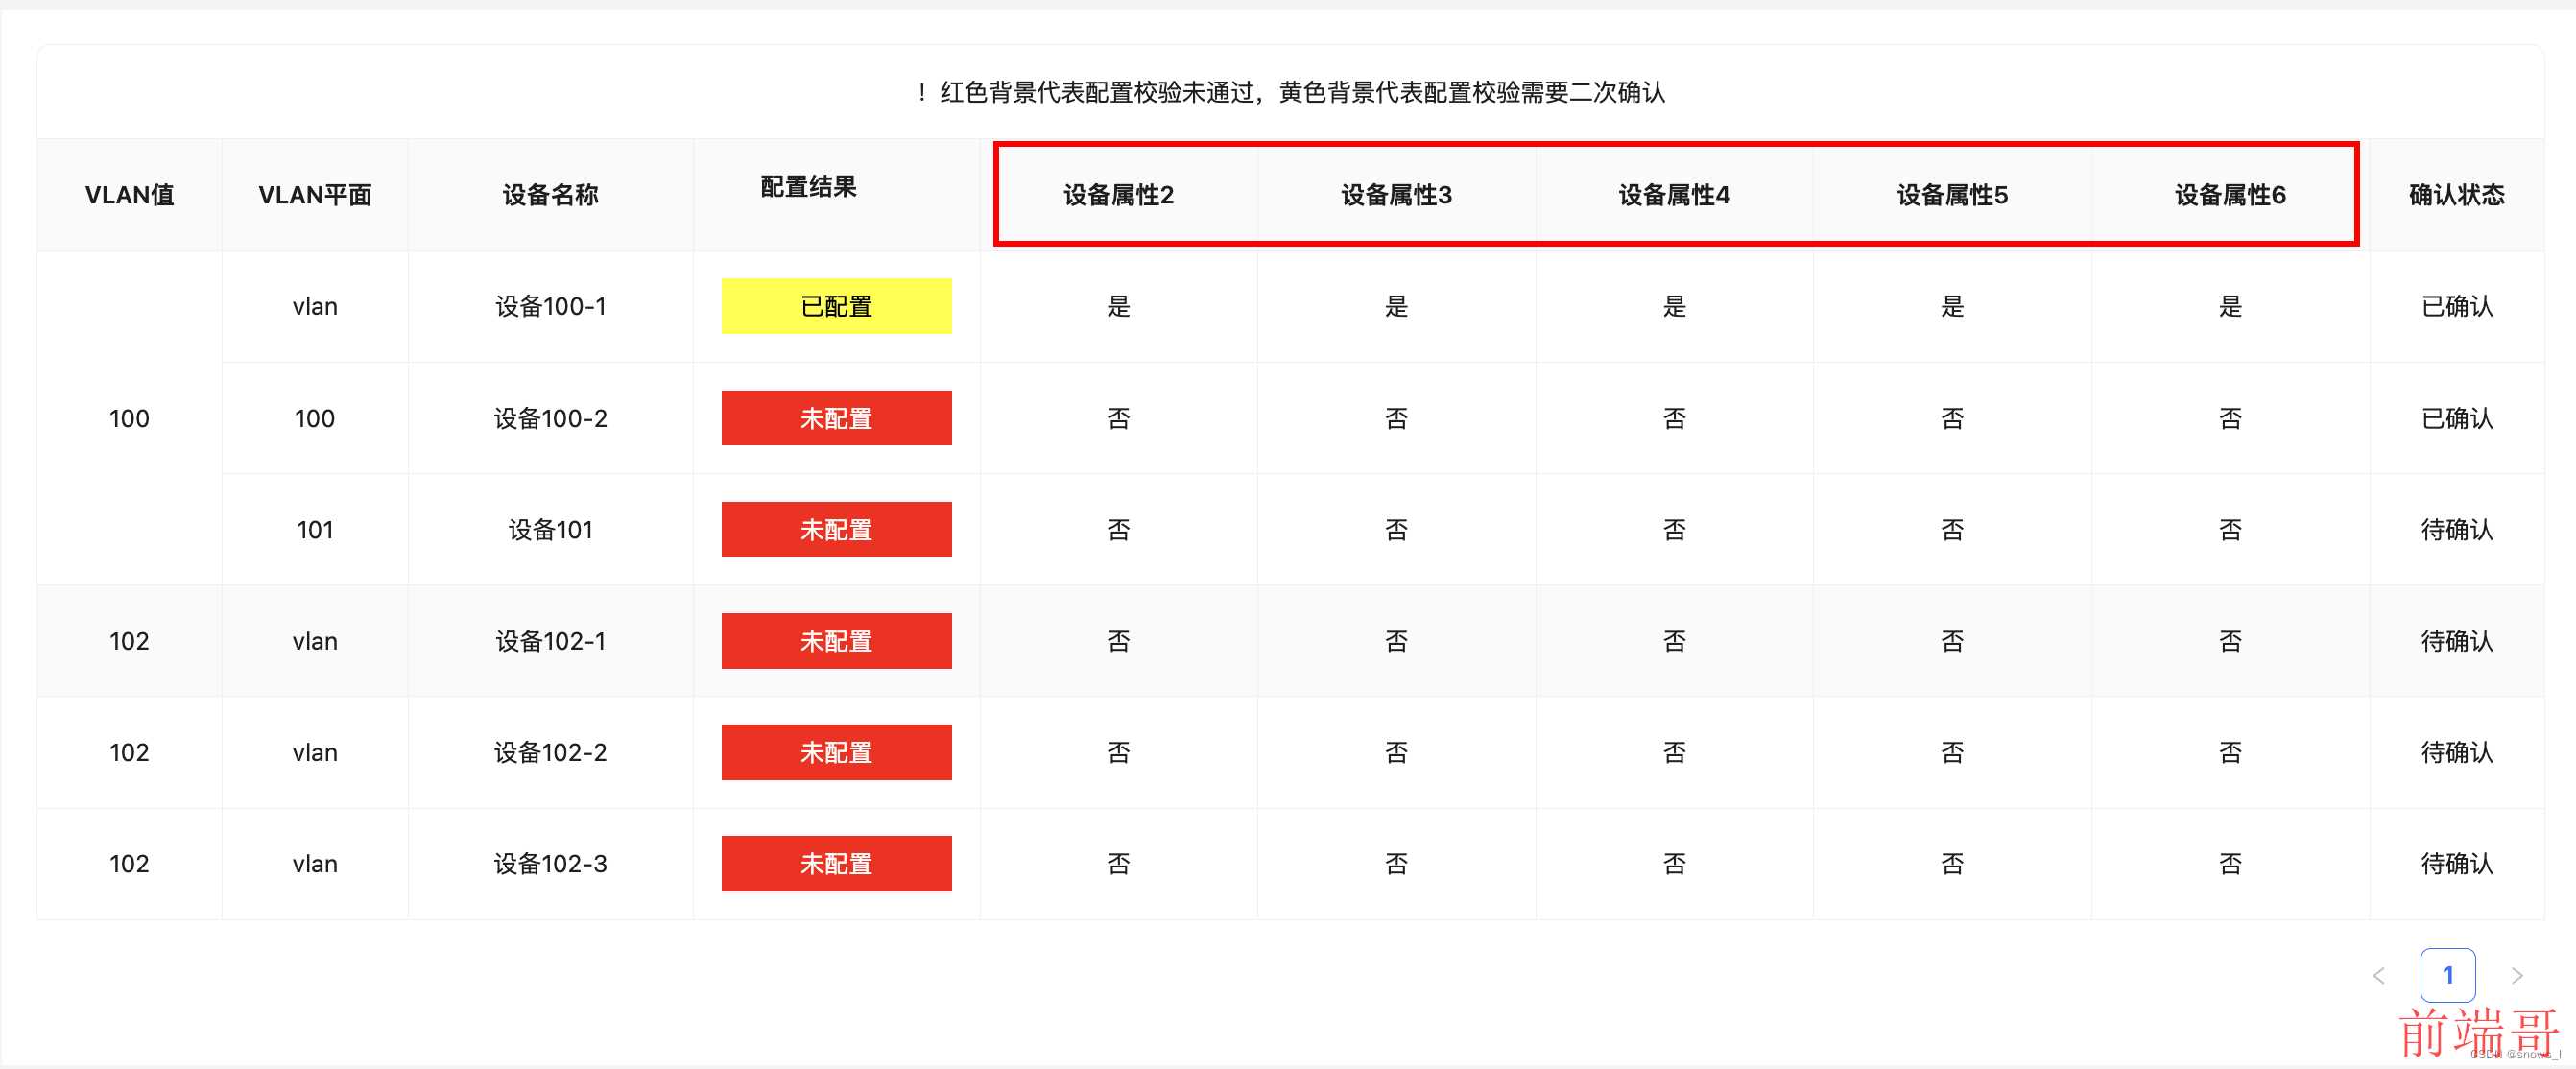
代码如下:
const state = reactive({ columns: [ ... { title: '设备属性集', dataIndex: 'deviceAttr2', key: 'deviceAttr2', colSpan: 5, align: 'center', width: '200px' }, { title: '设备属性3', dataIndex: 'deviceAttr3', key: 'deviceAttr3', colSpan: 0, align: 'center', width: '200px' }, { title: '设备属性4', dataIndex: 'deviceAttr4', key: 'deviceAttr4', colSpan: 0, align: 'center', width: '200px' }, { title: '设备属性5', dataIndex: 'deviceAttr5', key: 'deviceAttr5', colSpan: 0, align: 'center', width: '200px' }, { title: '设备属性6', dataIndex: 'deviceAttr6', key: 'deviceAttr6', colSpan: 0, align: 'center', width: '200px' }, ... ], })
效果如下:
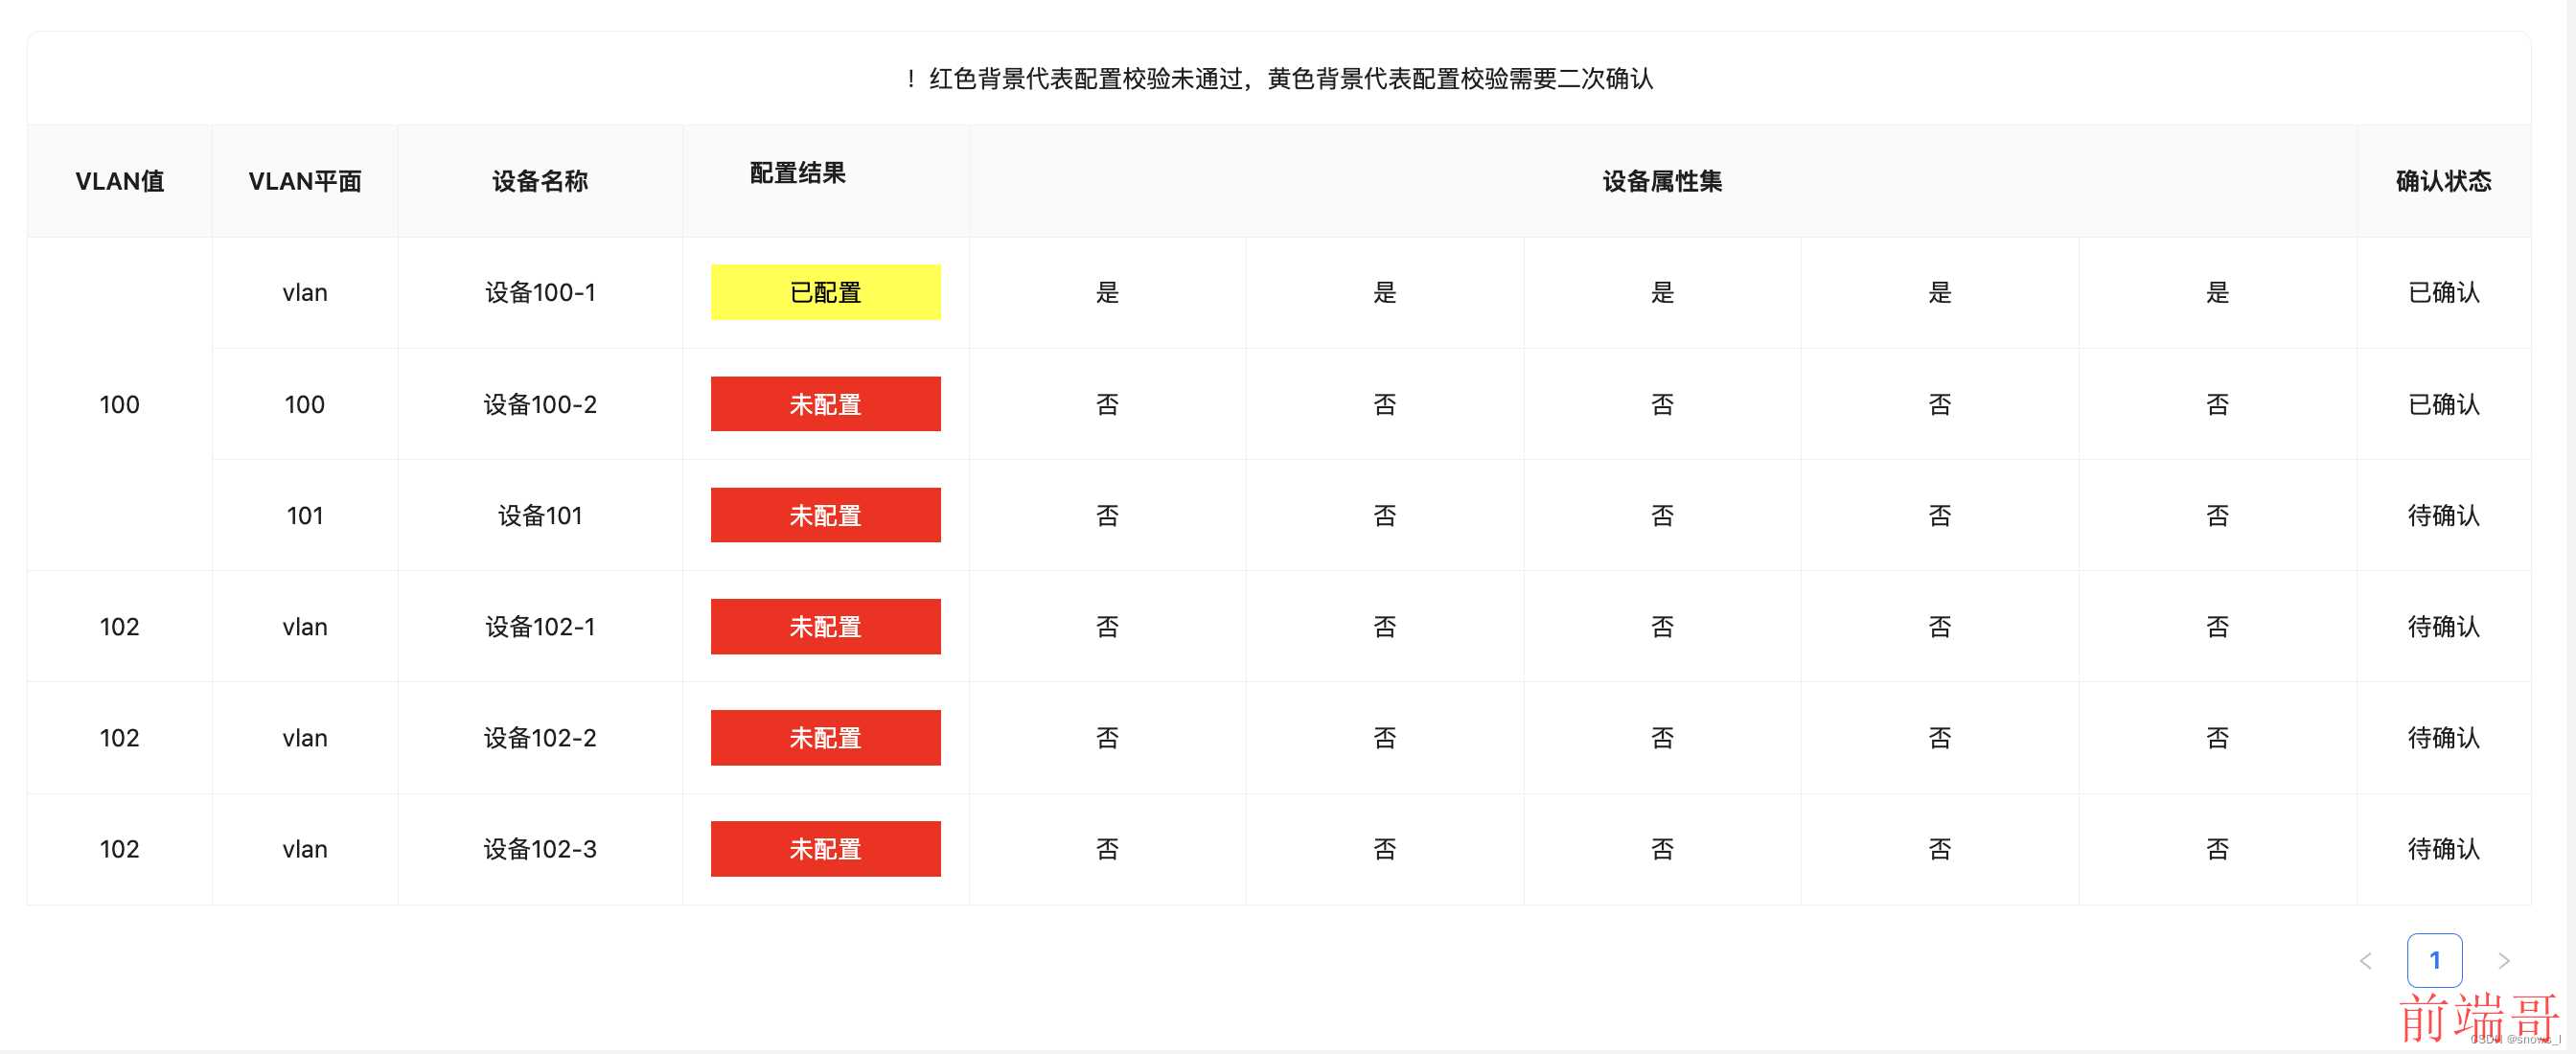
特别注意:从合并开始, 后面的字段都要设置成colSpan:0, 和单元个合并同理

